How To Waterproof A Leaky Retaining WallUpdated 9 months ago
Retaining Wall Waterproofing Guide
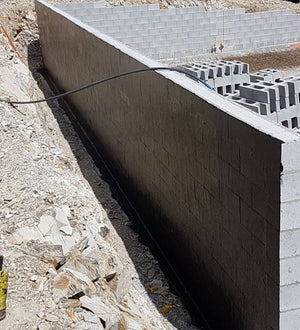
Waterproofing a leaky retaining wall is essential to prevent water seepage, structural damage, and potential erosion. Using Liquid Rubber DIY products, you can protect your retaining wall effectively and ensure its longevity with this simple step-by-step process.
Why Waterproof Your Retaining Wall?
- Prevent Water Seepage: Seal cracks, gaps, and wall-floor joins to stop water infiltration.
- Protect Structural Integrity: Prevent damage caused by prolonged water exposure.
- Improve Durability: Shield the wall surface from erosion and long-term wear.
What You’ll Need
Before starting, gather these tools and materials:
- Liquid Rubber DIY Waterproof Sealant
- Geo-Textile: For reinforcing cracks, corners, and joints.
- Rapid Cure Spray (Optional): Speeds up curing time.
- Cleaning Tools: High-pressure water blaster and wet/dry vacuum.
- Application Tools: Brush, roller, or spray machine.
- Safety Gear: Gloves.
Step-by-Step Instructions
Prepare the Surface
- Clean the entire surface of the retaining wall, including the footing.
- Scrape away any dry concrete spillages.
- Use a leaf blower to remove any dust and ensure the surface is clean and debris-free.
Reinforce Cracks and Vulnerable Areas
- Pre-cut Geo-Textile to fit cracks, gaps, holes, and corners.
- Ensure to cut a 150mm strip of Geo-Textile for the entire wall-floor join.
- Apply a coat of Waterproof Sealant to these areas using a brush, and embed the Geo-Textile into the wet sealant. Smooth out any air bubbles or wrinkles for a perfect bond.

Apply the First Coat of Waterproof Sealant
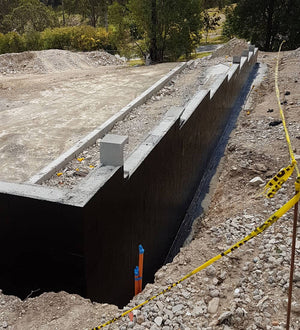
- Apply the first coat of Waterproof Sealant to the entire retaining wall surface, using an up-and-down motion to ensure even coverage.
- Use ample product to achieve a uniform layer, especially over reinforced areas.
Apply the Second Coat of Waterproof Sealant
- Once the first coat has cured, apply a second coat using a left-to-right motion. This ensures thorough coverage and creates a durable waterproof barrier.
- Aim for a dry-film thickness of 1.5mm (approximately 2 liters per square meter).
Optional: Speed Up with Rapid Cure Spray
- Use Rapid Cure Spray to set the product instantly and reduce curing time. Ensure the spray is fully dry before applying additional coats.
- Use Rapid Cure Spray to set the product instantly and reduce curing time. Ensure the spray is fully dry before applying additional coats.
Cure and Protect Before Backfilling
- Allow the Waterproof Sealant to cure for 48-72 hours before applying protection boards (corflute).
- Before backfilling, add gravel and ag-pipe to improve drainage and prevent water pooling against the wall.
Additional Tips
- Avoid Applying in Wet Weather: Ensure no rain or dew is expected during the application and curing process.
- Protect During Backfilling: Always use protection boards to prevent damage to the sealant when filling with dirt.
- Ideal Conditions: Apply products in temperatures between 10°C and 32°C for optimal results.